Wednesday, December 14, 2011

5 Fun Christmas Ideas for any Baker!

1. Dessert Ornaments-  from Sur La Table


I absolutely LOVE these ornaments!!!  I own quite a few and hope to continue with my collection.  I have one Christmas tree with my "traditional" ornaments, and then a smaller tree with all dessert and baking ornaments!  I love it!

2. Flavorings and Extracts-  from King Arthur Flour

Fiori di Sicilia  - 1 oz.Vanilla Bean Paste - 4 oz.Pistachio Flavor - 1 oz.

There are endless possibilities with these different flavorings.  These 3 are my favorite, but there are many more on their website!  Use them in cakes, icings, milkshakes and much more!

3. Airbrush Machine-  from Karen's Cookies

Pegasus Professional Airbrush System
This is on my wish list!  I have made lots of cookies using Wilton's Color Mist, so I would love to have an airbrush machine!

4. Ultimate Cookies by Julia Usher-
Julia M Usher's Ultimate Cookies

If you have not seen this book yet, you definitely need to check this out!  This 270 plus page book shows you how to make the most beautiful cookies!  I mean... just look at the cookies on the cover.  If you love, or even like to make cookies, this is a must have for you!

5.  Pretty Aprons- from Amazon 

Product DetailsDimensions Stamped Cross Stitch Life Is Sweet Apron


There are only 10 shopping days left before Christmas!  Is it just me or is this holiday season just flying by?!  I feel like I still need a few more weeks to get everything done.  I always have a mile long list of things I want to bake for Christmas.  I probably only get 1/3 of the list done.  

Ahh... oh well.  You do what you can do!  Remember that.  No one is going to notice that things you didn't make.  They will appreciate the things that you do make!  

Now... get shopping and baking!  

Sunday, December 11, 2011

Mini Christmas cookies

Here are some mini Christmas cookies that I made!  Then, I packaged them in a glass jar and tied a ribbon on to give as a holiday gift!  

Hope you enjoy!  


Friday, December 09, 2011

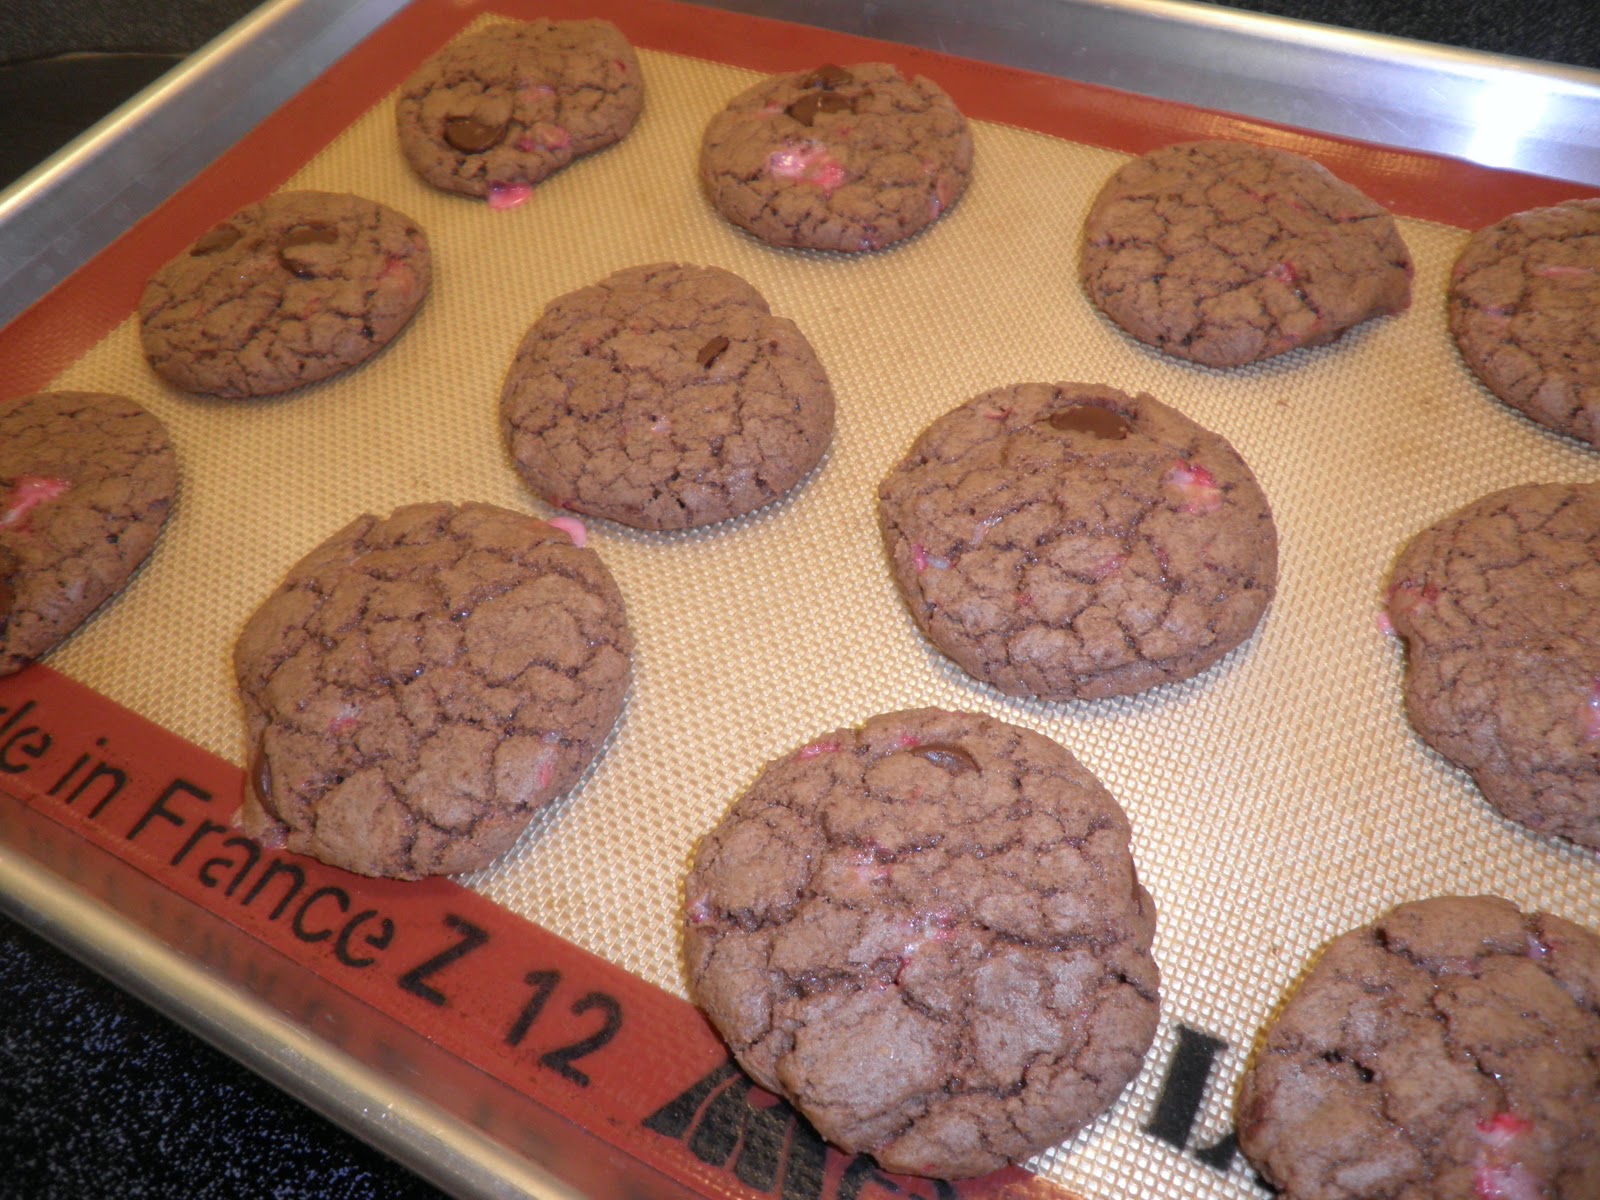
Edible Christmas Gifts #5 Chocolate Peppermint Cookies

It's December and it's gloomy and snowy!  We have yet to get any significant snowfall, but the past couple of days there has been snow on the ground.  It's flurrying right now as I type this.  I love the fall, but absolutely love when Christmas time comes!  My house is decorated but I am still behind on a lot of things!

I still have a pot of mums on my front porch.  Yes, I walk by it everyday and never throw it out.  Then in the back yard, our table and chairs are still out.  I think they will be ok, but we still have the umbrella up!  And that's a job for my husband.  He has been so busy lately with work and lacrosse, so he has not really had extra time for "chores" around the house.  This weekend we have nothing planned, which is very unusual for us, so hopefully we can get all that done!  Please tell me that I am not the only one who slacks a bit when the weather turns cold and all you want to do is be inside your nice warm house and bake cookies!

Which brings me to my next Edible Christmas Gift idea!  I make a lot of sugar cookies to decorate with royal icing, but I wanted to make something different.  These have chocolate and peppermint in them!  Yum!  These make great gifts because they will stay fresh for up to 2 weeks and they are so easy to wrap!  Also good for Cookie Exchange parties!

Chocolate Peppermint Cookies

Ingredients
  • 4 oz dark chocolate chips
  • 2 cups (10 oz.) flour
  • 2 tsp. baking powder
  • 1/4 tsp. salt
  • 3 eggs
  • 1 1/2 cups (12 oz) sugar
  • 1/2 cup (4 oz) oil
  • 2 tsp. vanilla extract
  • 1/2 cup milk chocolate chips
  • 15-20 small candy canes, crushed  (place candy canes in ziploc bag and crush with the bottom of a metal measuring cup or rolling pin)


Directions
  1. Preheat oven to 375 degrees
  2. Melt the dark chocolate over a double boiler or in the microwave.  Let cool slightly.
  3. In mixer, beat eggs and sugar until well blended.
  4. Add the oil, vanilla and melted chocolate until combined.
  5. In separate bowl, combine flour, baking powder, salt and crushed candy canes.  Gradually add to chocolate mixture, mixing just until combined.
  6. Stir in the milk chocolate chips.
  7. Roll into balls about 1 1/2 -2 inches.  Even space them on the baking sheet lined with a silpat, or parchment paper.
  8. Gently press down on the dough so they flatten out a bit.  This helps the cookies to bake evenly.
  9. Bake 10-12 minutes or until done.  


Once completely cooled, stack them in a plastic treat bag and tie with a ribbon.  Great way to give these cookies as a gift!  Or package them in a box or on a platter!  Enjoy!  

I am just finishing up some Christmas sugar cookies, so I hope to share them with you soon!  

Leave me a comment and tell me what the weather is like where you live!  Is it cold and snowy, or sunny and mild?!  

Monday, December 05, 2011

My Kitchen Essentials... A Great Shopping List for any Baker!

With all the edible gifts I have been making, I thought I would also put together a list of my Top 10 Kitchen Essentials that would make great gifts for any Baker on your shopping list!  Or maybe just for yourself!  

I love Christmas shopping because I love getting and giving gifts to the important people in my life!  But sometimes you have to slip something for yourself in there too!  I mean come on... you deserve it!  My mom and sister happen to love baking and cooking like I do, so my Christmas shopping most likely involves getting something kitchen and baking related.  

My Top 10 Must Have Kitchen Essentials:

1. Viking 5 Qt. Stand Mixer- Yes, I know... this is a pricey item.  And most likely, you will not be buying one of these for anyone for Christmas.  And if you do... they will be very lucky!  But honestly, if you love to bake, it is totally worth the investment!  With its 800 watt motor, it is sure to be able to handle even the toughest doughs!  Before I went to Culinary School, I didn't mind using a hand mixer.  But when you go from a stand mixer back to a hand mixer, you notice the difference!!!  Great investment!

Viking Professional 5 -quart Stand Mixer
photo courtesy of Amazon

2. Silpat-  These non stick baking mats are amazing!  No need to grease the pan because nothing sticks to them!  They are oven (up to 480 degrees), freezer, and microwave safe.  Although, I have to be honest, I cannot think of one reason to use one of these in the microwave!  So much nicer than parchment paper, and they are reusable and last a very long time!  

photo courtesy of Amazon

3. Half Sheet Pans- I buy these at Wal Mart.  They are a bit bigger than the normal cookie sheet.  Its 13"x18"x1" and a heavy weight.  Thin pans will result in uneven baking and can burn your baked goods.  The Silpats also fit very nicely on these pans!  

Nordic Ware Bakers Half Sheet, 13 by 18 by 1 Inch
photo courtesy of Amazon

4. Digital Scale-  Probably 99% of the things I made in Culinary School was made using a scale.  In the beginning, they taught us how to use a weight and balance scale.  Now, that was pretty annoying! Haha But then they let us use digital scales, which was so much easier.  If you are using measuring cups, you will have a different amount of the ingredient everytime.  With a scale, it is much more accurate.  At least for baking, it is very crucial that you have the exact amount of each item otherwise it can ruin the finished product.  Most of the recipes I put on this blog are in cups because most people do not weigh out ingredients, but it really is more accurate! 

Escali Primo Digital Scale, Yellow
photo courtesy of Amazon

5. Good Knives-  Invest in good knives.  I got these knives as part of my "tool kit" in Culinary school 4 years ago and I LOVE them!  

Messermeister Meridian Elite Chef's and Paring Knife Set
photo courtesy of Amazon
6. Spatulas-  A must have for any baker!

Messermeister High Heat Spatula
photo courtesy of Amazon

7. Microplane- I have a zest grater, and then a finer one for spices.  Love these!

Microplane 40016 Classic Black Spice Grater
photo courtesy of Amazon

8. Stacking Cooling Racks- When space is at a premium, nothing is better than being able to have 3 cooling racks in the place of just one!  These are another thing that I get at Wal Mart!
Wilton 2105-459 Excelle Elite 3-Tier Cooling Rack
photo courtesy of Amazon
9. Digital Candy Thermometer-  You can use these for a ton of different dishes!  From making caramel to cooking a roast to frying chicken wings!  It is so easy to use.  Simply place the probe into the pot or inside of a roast and set the temperature and once it has reached that temperature, the buzzer goes off!  No more babysitting the classic candy thermometer that clip on the side of a pot.  The digital version is obviously more accurate as well, so you won't burn that caramel!  

Component Design Digital Candy Thermometer, Timer and Clock
photo courtesy of Amazon

10. Fun pans- I have a ton of different baking pans in all different sizes!  These are some of my favorite!
 HIC Brands that Cook Essentials Silicone 12-Cup Muffin Pan
photo courtesy of Amazon
Bite-Size Cheesecake Pan
photo courtesy of King Arthur Flour
    • Bake and Give Pans - I used these disposable pans to make individual cakes for favors at my sister's bridal shower!
    Bake and Give Square Pans & Lids - Set of 8
    photo courtesy of King Arthur Flour

      And there you have it... My Top 10 Kitchen Essentials!  I could have gone on and on.  There are so many good kicthen tools out there!  I hope my list was helpful to you, and you found some things that you could get the baker in your life, or just for yourself!!!  

      Happy Baking & Shopping!


      Tell me what YOUR kitchen essentials are!  I love to hear from you!  Go ahead... leave me a comment :-)


      Saturday, December 03, 2011

      Chocolate Covered Candied Orange Zest

      Now that I have started to show you how to make some Edible gifts, I am going to show you fun and easy ways to package them!

      Packaging your treats in a beautiful way is almost as important as the gift itself!  You know what they say, "You eat with your eyes first!"  And it's true!!  You want to eat something that appeals to you!

      Here are a few tips for when you are packaging your treats!
      • If you have a fragile treat, take special care that you package it in a way that will not ruin all your hard work!  If it is cookies with icing on top that will get messed up, package them in a box so they can lay in a single layer, rather than stacking them!
      • On the other hand, if your treat is more stable, you have lots of options for packaging!  Boxes, bags, and tins will all work great!  The Chocolate covered candied orange zest below is packaged in a Christmas tin since they can be piled on top of each other without getting ruined. 
      • Finding packaging for your budget!  I love the dollar stores at Christmas time!  They have such great deals on packaging.  I got tins, shown below, for just $1!  So you know I had to stock up!  They also have lots of great treat bags, either clear or with pictures on them.  If you want to make something extra special and it is in the budget, you can get some beautiful packaging from stores like The Container Store, Nashville Wraps, or Sur La Table.
      • Package your homemade treats in a gift basket with a clear basket bag and tied with a beautiful ribbon!  Stuff the bottom of the basket before you add the gifts with raffia or tissue paper, then place your gifts on top.  
      Photo: raffiaonline.com

      • Another alternative to a gift basket is a gift bag!  Add your goodies to the bag and then find some coordinating tissue paper to stuff in the top.  Add a ribbon to tie the handles together if you like!  Beautiful gift bags can be very inexpensive!
      • Add a pretty label so that your loved one knows exactly what you made, or who it is from.  My Own Labels has always been a favorite of mine to order pretty labels.  And they are very reasonable!!  They also have great pictures on their site for different ways to package things!  
      • If you are doing a theme gift basket, use a more creative item as the basket.  For example, if it is for a baker, use a stainless steel bowl that they will be able to use for a long time!  If it is for a hot chocolate lover, put some homemade hot chocolate mix in a pretty mug.  Every time they re use the bowl or mug, they will be reminded of your delicious and thoughtful gift!

      Here are the Chocolate Covered Candied Orange Zest that I made!  See the post I made about making Candied Orange Zest and then simply dip them in melted chocolate.  I used dark chocolate here, but you can use milk or white if you prefer!  Then, I laid them down on a silpat or parchment lined baking sheet.  Once all of them are dipped, put in the fridge so the chocolate can harden.  


      To package, I just lined a pretty tin with parchment paper and filled with the orange zest.  So easy right?  Anyone could do this!  These are unbelievably delicious!  I make candied orange zest every year, but I have never dipped them in chocolate before so my family is in for a treat on Christmas!


      Share these delicious treats with someone you love this holiday season!  

      Thursday, December 01, 2011

      Edible Christmas Gifts #4 Peppermint Bark Trees

      Happy December!!!  

      Feels like I have not posted on here in forever!  The past couple of weeks have been very busy for me.  I went to visit my sister and brother in law in Boston for Thanksgiving.  Normally, my mom does Thanksgiving every year.  But my sister just bought a new house in the past year and wanted to have it at her house this year.  Unfortunately, my parents were unable to make it to Boston as planned because my Gramma was in the hospital.  Sadly, Wednesday night my Gramma passed away.  So immediately after being in Boston, I had to go back to Pittsburgh for her funeral. Now I am back in Canada, but I have to go back home to Pittsburgh next week.  So I have had very little time for any baking or blogging!  

      But I am back now and want to share with you my next Edible Christmas Gift!  

      When I was in college, I was watching either Paula Deen or Ina Garten on the Food Network and they made Peppermint Bark for Christmas.  I made it for my family that year and everyone loved it, so I have been making it every year ever since!  

      This year, I wanted to switch it up a bit.  I saw on Pinterest someone made Peppermint Bark in a snowflake mold.  It looked so nice and extra special.  I couldn't find similar snowflake molds, but I did find these great tree molds by Wilton!  


      They are the perfect size for individual Peppermint Barks!  They are so easy to make too!

      Peppermint Bark

      Ingredients
      1 cup dark chocolate chips
      1 cup white chocolate chips
      1/2 cup crushed candy canes

      Directions
      1. Melt the dark chocolate slowly in the microwave or over a bain marie.  
      2. Once melted, pour melted chocolate into a plastic piping bag.  You can also use a ziploc bag and cut off a small hole at one of the bottom corners.
      3. Pipe a small amount of chocolate in the mold, enough to cover the bottom.  Once you have filled all the molds, tap on the counter to make sure everything is smooth and there are no air bubbles.
      4. Place in the refrigerator to set.
      5. Melt the white chocolate.
      6. Crush the candy canes into small pieces.  I used small candy canes that were in a small "bag" (see below) instead of "shrink wrapped".  This way, I could use a metal measuring cup to crush the candy canes.  
      7. Repeat step 3 with the white chocolate.  Sprinkle the crushed candy canes on top of the melted white chocolate.  Refrigerate to set, at least 3 hours.
      8. Once set, pop out of molds and enjoy!