Monday, June 25, 2012

Birthday Giveaway WINNER!!


Thanks to everyone who entered my Birthday Giveaway!  This past year has been one the best in my life.  I have really enjoyed sharing my baking, crafting and life adventures through this blog!  

I guess you are wondering who the winner is...  well the winning post is...

Make anything sweet. :)
Susie


I emailed you Susie if you are reading this.  Please email me back with your address within the next week so I can send out your package!!  


I may have had my blog for 1 year, but I am still only starting so hopefully there will be many more giveaways for you!  Thanks to everyone who reads my blog, follows me on Facebook and follows me on Pinterest!  


Wednesday, June 20, 2012

Strawberry Picking


Ahhh... there's nothing like spending a nice relaxing day going to a local farm to pick strawberries!  I went in the middle of the day and there were only a handful of other people there, which was nice.  The only other time I went was last summer right after the local schools got out for summer and the place was packed!  This year, I made sure to go during the day and while school was still in session!  

We love strawberries, so I wanted to go and stock up.  I got some to eat, some to make a pie, and some to freeze.  Freezing strawberries is so easy, and they taste SO much better than any frozen berries that you can buy from the grocery store.  They are nice to have throughout the year for pies, smoothies, sauces and fruit crisps.  


Normally when I freeze them, I freeze them whole with the stems still on.  Then when I am ready to use them, I set them on the counter for about 5 minutes so they become just soft enough so I can cut them up.  This time, I thought I would do some of the work now instead of later.  So I cut the stem off and cut them in half.  Then, I put them in a ziploc bag and froze them.  

The hubby said to me "I saw on the website that you are supposed to freeze them on a tray first and then put them in the bag".  I was like yea, but my way is fine too.  

Well... now I have a huge block of strawberry halves all frozen together!!  Ahhh of course!  Next time I guess I will listen to the hubby.  :-)  

So, if YOU want to freeze some strawberries that you have picked or just some from the store, lay them out on a baking sheet and freeze for a couple hours.  This is how they freeze the berries they sell in the store.  

"IQF" = Individually Quick Frozen

Then, you can put them in a plastic ziploc bag once they are already frozen.  That way they won't stick together.  Learn from my mistakes people.


The farm that I went to has a tractor that takes you out to the strawberry field.  I could smell the sweet strawberries when the tractor got close the fields.  So sweet and fragrant!  Then, they give you a row and you pick away!  And of course you have a try a few to make sure they are delicious!  

Then, the tractor takes you back to the farm and they weigh your strawberries.  They also had other fruit and vegetables that they grow there for sale.  I also got some Sugar Snap Peas, Potatoes and Rhubarb.  We had the peas and potatoes for dinner last night and they were delicious!  There is just something about eating locally grown, just picked food that just makes it that much more delicious!  


On the tractor ride back to the farm.  


Mmm... don't these look so yummy?!  They are so juicy!  I just got these yesterday and they are almost gone (besides the frozen ones).  I guess I will have to go back soon before they are done!  


Check out the farms in your local area!  Strawberries are in season right now!!!  I think blueberries are coming up soon too!  

Happy picking!  

*** Don't forget to enter my Birthday GIVEAWAY!  Details in the last post.  You have until Monday to enter!!!  Check it out! ***

Tuesday, June 19, 2012

Desserts by Annie's 1st Birthday & a GIVEAWAY!!


One year ago, I had this crazy little idea that I wanted to somehow document and keep track of the cookies and desserts I was making.  I had just recently got hooked on reading dessert and cookie decorating blogs.  So, I thought why not?!  I could make my own blog!  

It seems like I have had it for a long time, but also that it was just like yesterday that I was starting out on this journey.  I am no where near where I want to be.  I have SO many ideas in my head of things I want to make and do for this blog.  I will get there though, don't worry!  Honestly, at times I have been much better at posting than others. Sometimes life just gets in the way, and I keep putting that next blog post off another day, and another.  But I always come back. :-)  I love doing this! 

I started out thinking this blog would be mainly about decorating cookies.  As much as I love to decorate cookies, my sugar cravings were telling me that I needed to make all different kinds of desserts as well!  Here are some of the cookies I have made in the past year.
And some of the desserts.

At some point in the past year, Pinterest came into my life!  And, the creative DIY'er in me wanted to make crafts as well!!  So here are some things that I made.  Some ideas I got from Pinterest and some are just things I have wanted to make.  

I also got MARRIED this past year!!


And we got a dog and named her Bailey!  


She is the sweetest thing and we both love her to pieces!  She's my little baby.  And I often say to Jeff that I love her so much, I can't imagine what it will be like when we actually have real children!  


She is definitely spoiled.  She runs our lives!  But I couldn't imagine not having her now!


And it's not a birthday unless there is some cake involved!!  I made a Chocolate Devil's Food cake with French Buttercream filling and covered in Chocolate French Buttercream.


I will post the recipes, but I thought it would be more fun to have a GIVEAWAY!  Because, there also HAS to be gifts at a Birthday Party!


Birthday Giveaway:

Includes:
  • 3 Wilton Piping Tips, #1, #2 & #3
  • Mini Sifter
  • Regular Cupcake liners
  • Gift tags
  • Mini Cupcake liners
  • Box of Piping bags
  • Race Car Cupcake Set
  • Mini Cake liners (Like cupcake liners but you don't need a muffin pan!)
  • Silicone Baking sheet
  • Set of 6 Pink Ramekins
*All items have been provided by myself.  There are no sponsors here... Just things that I love and use and thought you would like too!!

Rules:
  • There are 5 ways to enter this giveaway.  Leave a separate comment on THIS blog post for each entry.  So you can leave up to 5 comments=5 chances to win!
  • You must live in the US or Canada.  
  • Giveaway ends next Monday June 25, 2012 at 8pm EST.
  • You must leave me your email address when you comment so I know how to reach you if you win!!
  • A winner will then be announced.  I will email you for you to claim your prize.
Ways to Enter:
  • "Like" my Facebook page.  
  •  Follow my blog.  You will find this on the right hand side of my blog.   
  •  Follow me on Pinterest!  
  •  Share this Giveaway on your Facebook page.  
  •  Tell me something you would like to see me make!  
*** For each entry, you must leave a comment on THIS blog post telling me you did each one.  Remember, separate entries please!!  If you already like or follow me on a certain site, just simply tell me you already do... that will count too!  :-)  


GOOD LUCK!!  


Thursday, June 14, 2012

Summer Grilling: PIZZA


Mmm... who doesn't love the smell of something grilling in the summertime?!  You know when you can smell your neighbor grilling hot dogs or hamburgers and it makes you want some right now.  My hubby is the typical male and loves to barbecue!  He gets a cold beer and heads out back with the dog and whatever he is grilling that day.  

A few years ago I was working at a resort in Wisconsin after Culinary school.  I was making the desserts for the restaurants and was also in charge of making the pizza dough for the Italian restaurant.  Every once and awhile when it was either slow or we were really hungry, we would trade desserts from the pastry kitchen for food from one of the restaurants.  That's when I first had one.  Oh. my. gosh.  The one cook made us grilled pizza and it was possibly one of the BEST pizzas I have ever had!  Ever since then, I have always wanted to try making some myself.  

So one day I was trying to figure out what to make for dinner and I remembered it.  I had everything I needed to make pizza, since we like to make it once every week or two.  Since I wasn't totally sure how to grill the pizza, I did what I normally do when I want to find something out.  I googled it.  

Turns out it is SO simple!  Must faster and more delicious than baking it in the oven!  I read that it is closer to baking a pizza in a wood burning pizza oven then a normal oven.  And it makes sense too.  It cooks at a much higher temp than the oven so it cooks in just a few minutes.  And the crust gets all charred and yummy!  

Pizza Dough
recipe adapted from King Arthur Flour

Ingredients:
  • 1 3/4 cup Pizza Flour (or All Purpose if you don't have it, but pizza flour makes it so delicious!  I get mine from King Arthur Flour)
  • 2-3 tbsp. Pizza Dough Flavor, again from King Arthur Flour.  It's a mix of cheese and garlic so you can add Parmesan and garlic powder as a substitute. 
  •  1/2 tsp. salt
  • 1 tbsp. olive oil
  • 3/4 cup warm water
  • 1 tsp. instant yeast
Directions:
  1. In mixer bowl, add yeast and warm water.  Let sit for 3-4 minutes so the yeast dissolves.
  2. Add the rest of the ingredients and mix until smooth, adding additional water or flour if necessary.  You want a nice, smooth dough that is not sticky to the touch.
  3. Let rise in a water place with a towel over the bowl for 1 hour. 
  4. For 2 thin crust pizzas, divide dough in half.  For one thick crust, use all the dough.  
Pizza

Ingredients:
  • Pizza dough
  • 1 ball of fresh mozzarella, sliced into thin slices
  • 1 can pizza sauce
  • Any toppings
  • Non stick spray for the grill
  • Flour for dusting
Directions:
  1. Roll the dough out to the desired size.  I made 2 pizzas from 1 recipe of pizza dough.  
  2. Set 1 on a  floured cutting board or pizza peel with plastic wrap on top.  Place the other dough on top.
  3. Heat the grill on medium heat.  
  4. If using vegetables for toppings, I sauteed them first so they are a little soft.  If you like them crunchy and raw, don't cook them first.
  5. Make sure you have everything you need by the grill when you start.  It will cook quickly, so you don't have time to be running to the kitchen to get anything!
  6. Spray the grill with non stick spray.
  7. Place the pizza dough onto the grill.  Cook for a few minutes until you see nice grill marks on the bottom.  
  8. Using tongs, flip the pizza dough over. 
  9. Quickly, spread pizza sauce on the already cooked side of the dough.  Add cheese and any toppings.
  10. Close the grill and allow the cheese to melt.  
  11. Once the cheese has melted, it's done!  I used a pizza peel to get the pizza off the grill.  You can also use tongs and a cutting board, but make sure not to let the cutting board actually touch the grill!!
  12. Cut, serve and enjoy!  


Don't worry... the dough will not fall through the grill.


Sauce, cheese and toppings!  One of the pizzas had just sauce, cheese and basil.  The other also had red peppers and mushrooms.  


Don't worry about the bubbles!  They will pop themselves.


Nice grill marks!


Move quickly while topping the pizza so you don't burn yourself!


YUM!!  Can't wait to eat these!


It's just like getting pizza that was cooked in a wood burning pizza oven!  SO delicious!


I like to experiment grilling different things.  What is the weirdest thing you have grilled before?!  I would love to try some new things!  :-)


Tuesday, June 12, 2012

National Peanut Butter Cookie Day!


I made these Peanut Butter Cookies for my cousin's high school graduation and then I just found out that it is National Peanut Butter Cookie Day!  What a great time to share my recipe with you!!  

I could eat these cookies all the time!  I am kind of on a peanut butter kick these days.  Especially peanut butter and chocolate!!  So I am also going to show you how can you turn your basic Peanut Butter cookie into a Peanut Butter Chocolate Chip cookie!  You simply just add chocolate chips to the dough and ta da!  You've got Peanut Butter Chocolate Chip cookies!!  I did half and half because I love them both ways.  

I have had people ask me whether adding an extra ingredient into a baked good will still work or if it will ruin the recipe.  You know, the whole "baking is a science and has to be exact" thing.  For the most part, I agree with that.  You can't forget the baking powder or add too much salt and expect it to turn out right.  But, adding something to a recipe like chocolate chips or nuts most likely won't change the outcome for the recipe.  Now, I am saying most likely won't change it.  Every recipe is different, but luckily for us, this recipe is delicious with some extra chocolate chips or peanut bits added in!  

Peanut Butter Cookies

Ingredients:
  • 1/2 cup butter, at room temperature
  • 1/2 cup brown sugar
  • 1 egg
  • 1/2 cup peanut butter
  • 1 tsp. vanilla
  • 1 1/3 cups flour
  • 1/2 tsp. baking soda
  • 1/8 tsp. salt
  • Granulated sugar, as needed
  • 1/2 cup chocolate chips, optional
  • 1/2 cup chopped peanuts, optional
Directions:
  1. Preheat oven to 375°.
  2. Cream the butter and brown sugar until light and fluffy. 
  3. Add the egg, peanut butter and vanilla.
  4. Slowly add the flour, baking soda and salt, and mix until just combined.
  5. If desired, stir in the chocolate chips and/or chopped peanuts.
  6. Form the dough into 2 inch balls, and roll in sugar. 
  7. Place on baking sheet, and gently press down with a fork in a crisscross pattern.  Or if you are making them with chocolate chips/nuts, gently flatten with the palm of your hand.  
  8. Bake for about 15 minutes or until lightly browned. 


Everyone needs to have a good Peanut Butter cookie recipe and this one is delicious!  Happy National Peanut Butter Cookie Day... now go bake some cookies!!  


Monday, June 11, 2012

Graduation Cookies & Family Time!


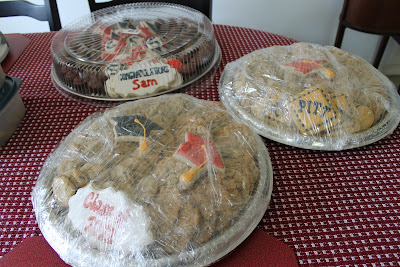
This weekend was my younger cousin Sam's high school graduation!  So the whole family was in town to go to his party.  I said I would make some cookies, so I just wanted to share some with you!  I made sugar cookies, brownies with fudge icing, chocolate chip, oatmeal raisin and peanut butter.  You know... the basics!  


All the cookies are wrapped up and ready to go!  


When we get together, we always like to get a picture of all the cousins with Gramma.  My one cousin was coming to the party later, so unfortunately he was not in the picture.  I guess I will have to photoshop him in later!  :-)  

There is the High School Graduate in the gray shirt.  Congratulations Sam!!!  Have fun in college!


Just playing a little Corn Hole with Jeff, my sister Gail and brother in law Dave.  It was SO hot this day!  We got a little burnt and only played for a little because we wanted to go back in the shade.  Oh and I hate to even add this, but Jeff and Gail beat Dave and me.  And I mean they beat us really bad!  It wasn't Dave's fault... it was totally mine!  :-/  I don't think I even scored us any points.  Looks like someone needs some more practice! Oh well... it was fun and that's all that really matters right?!


Here is my family!  

Left to right:  My brother in law Dave, sister Gail, Dad, Mom, me and Jeff.  


And Bailey was of course with us, but she had to stay home.  No dogs allowed at this party!  She loves the country though... so much room to run around and lots of birds, bugs and animals to chase!  


On Saturday night, we let Bailey meet the chickens for the first time.  And let's just say they will never meet again!!  My mom has 8 chickens and one of them happens to be named Annie.  :-)  

Well, as soon as the chickens were close enough, Bailey pounced and chased Annie for a few scary seconds.  Luckily Annie got away, but Bailey was right on her tail!!!  It would have been really sad for me if Bailey killed Annie of all the chickens!  I got to pick which one was Annie when they were only 2 days old! Thank goodness she didn't!  But she sure did have fun chasing them!  ;-)

I hope everyone has been enjoying the beginning of summer!!  I had a really nice weekend with my family!  My sister lives in Boston so it is always nice when we are all in town together!