Monday, June 27, 2011

Girly cookies


I made these cookies for an girl's 8th grade graduation.  They wanted flowers, butterflies and other decorated cookies in a pink and black color scheme.  I baked all the cookies and now it is time to ice them!  I will show you step by step how I decorate these cookies with royal icing.


In order to see the different petals once its dried, I piped every other petal and let it dry for about 30 minutes.  


Then, I went back and piped the other petals.  First, I outlined the area that I wanted to ice.


Then, I immediately fill in the petal, so you can't see the outlining once it has dried.


Then, once I have iced all the cookies, I let them dry overnight to make sure they are completely dry before I decorate them.

Here I have the 3 colors that I will decorate the iced cookies with.  Black, white and pink!


To give the flower an extra effect, I outlines these petals in black, and pink on other cookies.  


Here they are once they are done!  


I think these are some of my favorite cookies I have made!  I really love to make these cookies!  I keep thinking of all the different cookies I want to make!


Now, it is time for the cookies to dry again.  I let the cookies dry for at least 4 hours, or overnight, to make sure everything is dry before I package it.  Don't worry... they will not get stale or dry out!  


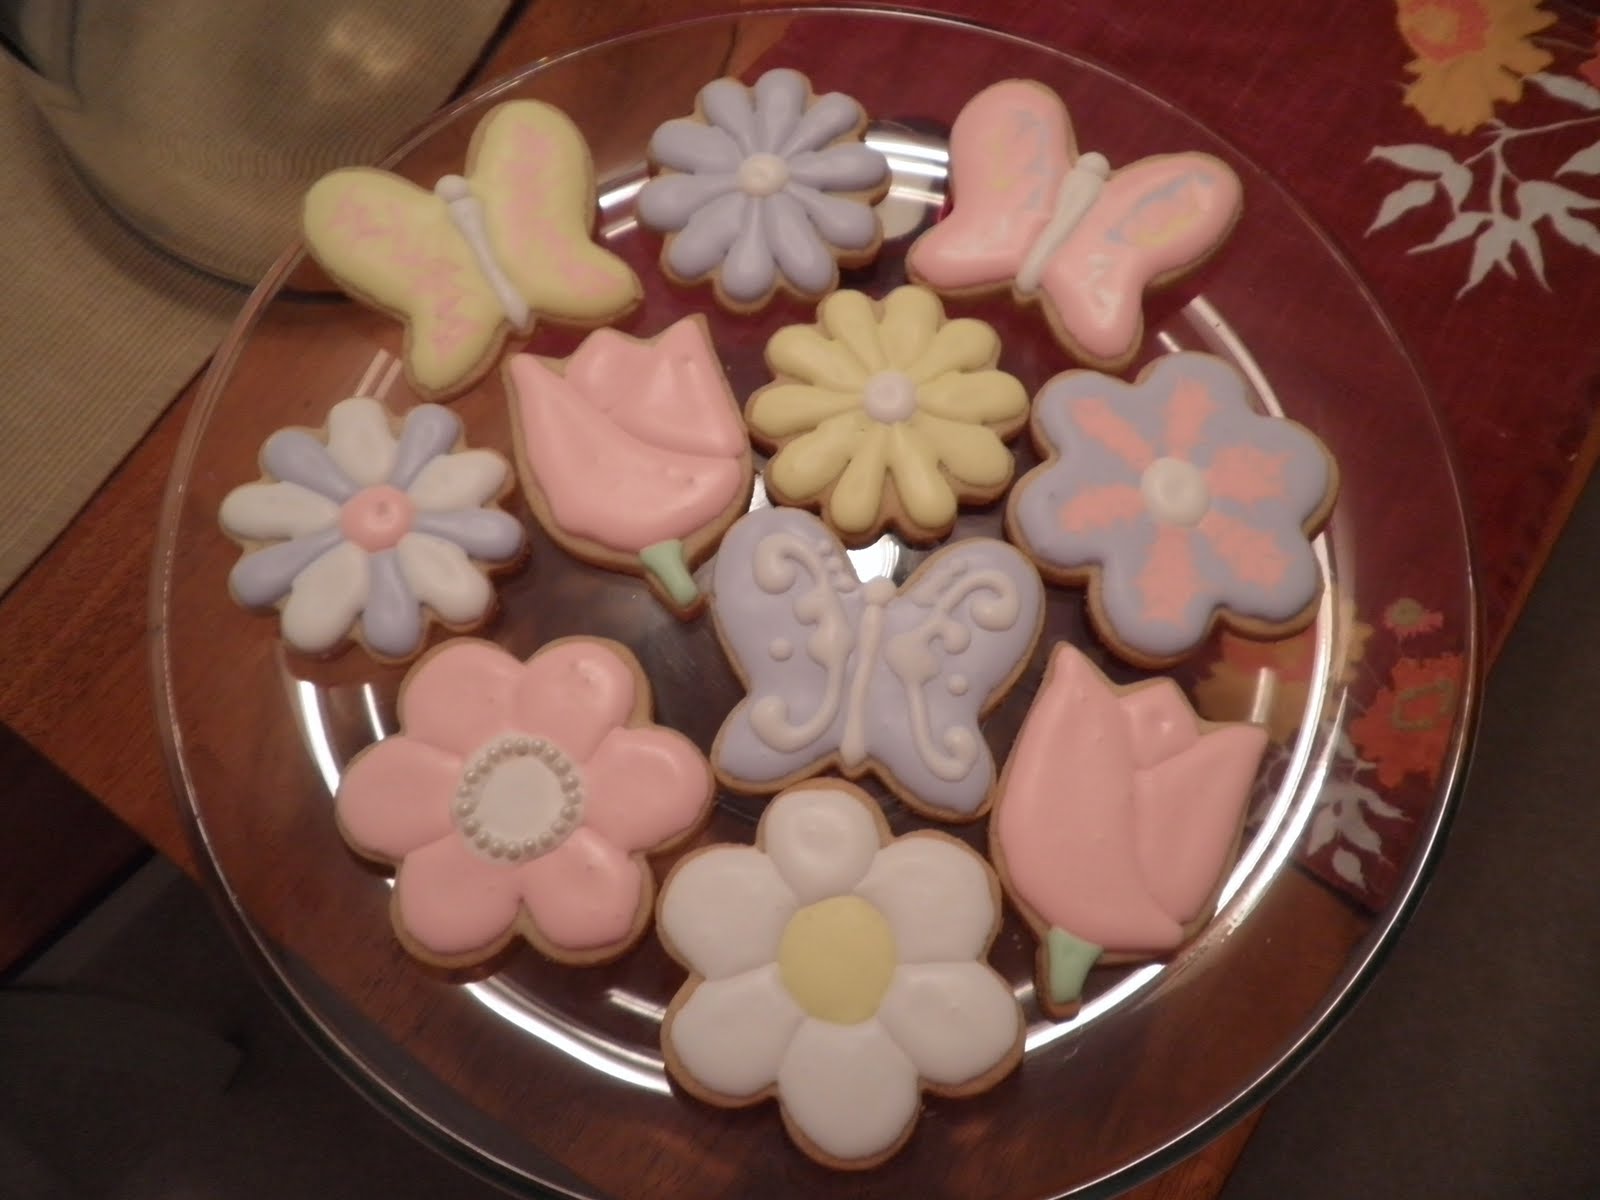
Here they are on the platter!  


The morning of the day that I needed to deliver these, I had to take Jeff to the airport at 5:30am.  So when I got home, I put these on the tray and thought I would be getting a nap before I had to take them.  WELL...  maybe it was my tired state, I put the plastic lid on and I must have pushed it on too hard, because the lid cracked!  Oh gosh I thought.  I need to go get a new lid.  This was a Sunday, so I was not sure when the stored opened.  Well, when I got to the store, it wasn't going to open for more than an hour!  Ah... back to home to wait!  
Don't worry... I went back to the store and got the lid.  Everything worked out in the end!  I took the cookies to the customer and they loved them.  Then I went home and had a nap!  :-)

Till next time...

Sunday, June 26, 2011

Pear and Frangipane Tarts with Rosemary Sugar

Hi Everyone!

As I was looking for a good recipe to try, I thought about the pot of herbs that I have on my front porch.  This is the first place that I have lived that gets good sun at my outdoor spaces.  All my old apartments had balconies or patios that were in the shade.  I always seemed to kill all the plants I try to grow.  

Now I grow rosemary, basil and sage!  So I was thinking, I wonder if I can find a dessert recipe that uses one of these herbs.  Some of you may be thinking... hmm... herbs in a dessert?! Give it a try.  These are SO tasty!

Let's start!

First of all, yes these are frozen tart shells.  I usually like to make everything from scratch, but this is one of those things that I like that they sell in the store.  They work really well, taste good and who can forget... they save a lot of time!  I especially love these ones because they are mini tart that come with tin baking pans, so I save them and can use them in the future!


I chopped the rosemary pretty fine (probably 1/2 sprig).  Then just added to a little bowl of sugar (about 2-3 tbsp).  I will top the tarts with this sugar mixture.


I used one good sized pear for this recipe.  I made 8 mini tarts, and still had some pear left over to snack on.  I chopped the pear up into little chunks.  I also just left the skin on.  

Frangipane is an almond and sugar mixture that will go in the bottom on the tart. 

Ingredients:
1/2 cup ground almonds
1/4 cup sugar
1 egg
3 tbsp. softened butter
3/4 tsp. vanilla
1 tsp. lemon zest (optional)
1 tbsp. flour

Mix all the ingredients together with a mixer until combined.

So, now I have everything ready to be assembled.


Using an offset spatula (or butter knife if you don't have on), spread a little bit of the frangipane mixture into the bottom of the tart shell.  Don't worry about making this look pretty... you will never see it once the pear and rosemary sugar are on top!  Fill it about half way.


Fill with pear pieces, and top with the rosemary sugar.


Bake at 350 degrees for about 30 minutes.  You want the pastry to get a nice golden brown and almost all of the sugar on top should melt.


Here they are!


I was a little hesitant to try these, because I have never used rosemary in a sweet dessert before.  Also, a little side note about myself.  I LOVE to bake, but I am a bit of a picky eater so I don't always eat everything I make.  THESE... I loved!!!  I immediately told my friend Ashley, who is a Pastry Chef, that she needed to try this.  It is that good!  

Serve warm and ENJOY!

Thursday, June 23, 2011

More Decorated Cookies


Here are some more decorated cookies.  These are very similar to the batch of cookies I showed you in an earlier post.  That group was blue, green and purple.  Same type of cookies, just some different decorations.  


I wanted to make and decorate a bunch of different cookies so I can have pictures of a wide variety of cookies.  I started putting pictures on Facebook, and giving cookies to different people and everyone seems to love them.  So I was thinking of different ways to sell them.  I have recently tried to get a booth at the local Farmer's Market.  Unfortunately, they do not have any room for new vendors right now, but the market moves indoors in November.  I guess they have less farmers and vendors then, because the manager told me they may have room then.  *Keep your fingers crossed!*   


This is the first batch of cookies that I have made for someone.  :-)


As I think about what my next adventure will be... I thought about my herbs that I grow in a pot on my front porch.  Hmm... let's see what I come up with!

Tuesday, June 21, 2011

Caramel Cheesecake Brownie Bites


I have been making a lot of cookies lately, so I thought I would make something a little different today.  I have not made brownies for awhile so I wanted to make some kind of brownie.  My 2 favorite kinds of brownies are turtle brownies (caramel and pecans) and then cheesecake brownies.  So I thought... what if I combined the two?  Well this is what I came up with!  

Caramel Cheesecake Brownies bites
2 oz. unsweetened chocolate
1/2 cup butter
2 eggs
1 cup sugar
1 tsp. vanilla
1/2 cup flour
2 oz. pecans

Cheesecake mix:
4 oz. cream cheese 
1 egg
1/4 cup powdered sugar
1 tsp. vanilla

I used pre-made caramel in this recipe.
  1. Preheat the oven to 350 degrees.  Grease the mini- cheesecake pan, or an 8x8 pan.
  2. Melt the chocolate and butter on the stop over low to medium heat. 
  3. Once it is melted, take off the heat and put in bowl.
  4. Add the eggs, sugar and vanilla in the first list of ingredients, and mix with a spatula until combined.
  5. Add the flour and mix until combined.
  6. Mix in the pecans.
  7. Set aside.
  8. In a small or medium bowl, mix the cream cheese, egg, powdered sugar and vanilla until combined.

Here is the pan that I used.  I got it from King Arthur Flour.  It has removable bottoms so they come out to the pan easily.  LOVE this pan!


Using a spoon, fill the pan about half way with the brownie mixture.  


Then add a spoonful of the cream cheese mixture on top.  Do not fill that to the top because the batter will rise.  (Note: I fill the brownie mixture about half way, and the cream cheese mixture about 1/4 the way to the top, leaving the top 1/4 open.)


Pipe a dollop of caramel on top.  If you do not have a piping bag, you can use a sandwich bag and just cut a small hole at the bottom corner. 


Using a knife, swirl the caramel in the cheesecake mixture.

Bake for about 35 minutes.  They will be done when you insert a sharp knife or toothpick in the top and it comes out clean.  Note:  The cheesecake will be done before the brownie is, so make sure you check with the knife or toothpick!


Here they are.  SO yummy!!!


Enjoy!


More Cookies...


Here are some pictures of cookies I recently made.  I iced the whole cookie in a single color, and let them dry completely!  You want to make sure the icing has dried because you want to have a smooth surface to pipe on.  Then with thick, white royal icing (so I can get detailed designs) I piped a variety of designs on these cookies.  


I love making cookies like these.  They look so pretty!  They take awhile to decorate, and my hand started to get numb by the time I was done, but it was worth it!


ENJOY!

Monday, June 20, 2011

Golf and Birthday Cookies


About a week after I first tried to make these cookies, it was Jeff's 28th Birthday and then just a few days later he was leaving for a Bachelor weekend for one of the weddings this summer that he is in.  So... of course I thought I had to make cookies for both events.

Jeff LOVES golf!  He would golf a few times a week if he could.  The bachelor weekend also happened to be a golf weekend.  So I did some research online for golf cookie ideas and this is what I came up with.  


They are not perfect.  I am still learning, but for my first attempt at anything besides flowers and butterflies, I think I did an ok job.  I did have a couple of issues that I wanted to talk about.

1. Black food color is so tricky!  
  • At this time, I was using the Wilton food coloring (I will tell you about the new coloring I use soon).  I wanted to get the gray color to use on the golf clubs.  I started off with the white icing and added just a touch of the black.  As I was mixing it, it looked more like grayish purple than gray.  I didn't have any other black or gray coloring, so this would have to do.  I piped the golf clubs anyways.  After it dried, I have to say that it looked a lot better.  Not so purple.  
  • Now I had to make the black color for the handle and the outline.  I added A LOT of black, and still... it looked purple!  So I just added a lot more and let it sit in the fridge for awhile, hoping that it would look more like black.  It did!  
2. The first golf club I made looked more like a hockey stick than a golf club!  I made the "shaft" of the club a little too thick.  By the last one, I think I got it right.  

I then thought about how I would make a golf ball look like an actual golf ball and not just a white circle.  I have white edible "pearls" that I had used for my sister's bridal shower, and they were perfect!  While the icing was still wet, I took clean tweezers and carefully placed each pearl to give the crater like effect that a golf ball has.  

Now, on to Jeff's birthday.  Since I already was making golf cookies for the bachelor weekend, I used some of those for his birthday too.  Then I just added some birthday cookies.  


Here is the end result!  Jeff must have liked them because he was trying to eat them before his party and I had to stop him.


Happy Birthday Jeff!  

Happy Father's Day!


Happy Father's Day to all the great Dads out there!

Since I was not in town to see my own Dad on Father's Day, I couldn't give him these Father's Day cookies.  So I naturally did the next best thing.  I sent him pictures!  But I also made sure that my Mom would be making him some kind of dessert today.  


I think I need to add here that my Dad and I share a love for all things sweet.  I got the best of both of my parents.  My Mom likes to bake things, and my Dad likes to eat them!  They are perfect for each other!  It can be a little dangerous because I do love sweets so much and sometimes have a control issue when it comes to eating them.  I do however have the best Dad that is always there for me when I need him!  Love you Dad! 


Since I couldn't be with my own Dad today, I took these with me to my boyfriend's parents' house.  They of course loved them too.  I think his Grandpa was happy that he got to take some home with him too!  


Happy Father's Day again!

Sunday, June 19, 2011

Decorated cookies

I was looking for a new dessert to try and I came across a blog about a lady who makes these amazing sugar cookies decorated with royal icing.  I honestly can't even remember how I stumbled upon her blog, but boy am I glad I did!

First thing I did was get my Professional Baking book from Culinary School to find a good sugar cookie recipe.  Good... I had all the ingredients to make the cookies.  Then I went to the Wilton's website to find a recipe for Royal Icing.

Now, if any of you are thinking... Royal icing?!  Yuck!  I know where you are coming from.  We never used royal icing to decorate cookies in school, and the only time we used it was basically to hold something together (it dries really hard and is like glue for food) or to decorate something.  It was not exactly something that I thought tasted very good.  But honestly, it is all about the flavoring!  I put a mixture of vanilla and almond extract in mine and it is delicious!  My boyfriend, Jeff, says he hates almond flavoring, and even he loves it!  I never told him what exactly I use to flavor it, so he probably doesn't even know he likes almond extract!  Moral of this story...  as long as you flavor the royal icing, it tastes amazing!  I have given a lot of people these cookies and EVERYONE loves them!

The royal icing recipe called for Meringue powder.  I had never used this before, so I went to the local Michael's craft store and got some.  Once I got home, I started to bake...  Once the cookies were made and cooled, I started on the icing.  Thank goodness for my amazing Viking stand mixer!  The icing needs to be mixed for at least 10 minutes, maybe even up to 15!  I would not want to hold the mixer that long!  So I followed to icing recipe.  It was easy enough!  It was only 4 items: Powdered sugar, meringue powder, water and flavoring.  I then colored the icing.  I read online that if you color the icing and then leave it in the fridge for awhile, the color is better.  So that's what I did.

The only cutters I had at this time were some flowers, a butterfly and a heart.  So guess what I made first.  Flowers and butterflies!  The hearts will come in a little later...

In order to have definition between the petals and the body and wings of the butterfly, you have to do one part at a time, let it dry, then do the next.  Once you get the correct consistency for the icing, you can put it in either a piping bag with a tip, and/or a plastic bottle.  You can buy normal plastic bottles at Walmart, but then you cannot control the thickness of the icing when you squeeze it out.  I like to use these bottles.  These special bottles have a coupler attached.  That way, I can put on whatever tip I choose.  If I am filling a large section with icing, I may use a larger tip.  But if I want to do small, detailed work, I use a smaller tip so I can have more control.

On the flowers, I piped an outline for every other petal, then filled it in with icing.  Let them dry for at least 20-30 minutes and then did the other petals.

You can see in the picture below that the yellow flower was done this way.  You can see the separation of the petals.  On the other hand, the purple and pink flower is done differently.  I iced the whole cookie with the purple icing.  Then immediately while still wet, I added pink icing and took a knife and ran it through the pink to give it a different effect.


I took these first cookies I made over to my boyfriend's family and they loved them!  They are my taste testers when I am in Canada.  I have been taking them lots of different desserts lately!  Hopefully they don't get sick of them.  His Dad likes to make sure I bring lots of cookies over to their house.  :-)


Up next.... My boyfriend Jeff's 28th Birthday and Bachelor weekend golf cookies!